MS-SQL은 Korean Version인데 특정 MDF파일을 Attach하면 Attach된 DB의 Collate가 SQL_Latin1_General_CP1_CI_AS 이기때문에 한글 작업이 깨지는 상황이 된다. 이때 테이블의 Collate 속성을 변경해도 오류가 해결이 안되어 다음의 자료를 찾을 수 있었다.

다음의 단계를 수행하면 되며, 자세한 옵션은 본인이 해결 하면 되겠다.
  1. 기존 DB의 개체 생성 Script 저장
  2. Detatch
  3. 기존 DB의 MDF, LDF파일 이름을 변경해서 Attatch
  4. 1번에서 생성된 Script 실행
  5. DTS로 데이타 이동


Knowledge Base Article Number: Q711843
http://ssw.com.au/SSW/KB/KB.aspx?KBID=Q711843

Question by: Arun Iyer    Answered by: David Klein    Last Updated: 15/11/2007 12:02:16 PM
Spot an error? Please comment about this article

Question:
How do I change the collation order in my SQL Server 2000 or 7.0 database?
OR
I want to know how to fix the Database Collation differs from Server Collation Rule in SSW SQL Auditor
OR
I am getting the error 'Collation order on the two databases is different. SSW SQL TOTAL COMPARE cannot compare databases with different Collation orders'. I assume I need to change the collation order in my SQL Server database, how do I do that?

Answer:

Change the Collation of your Database

Using SQL Server 7.0

In SQL 7.0, there can be only one Collation per server, so to change the Collation of a Database you need to change the Collation of the server itself. A Database with a Collation that differs from the server cannot be attached to that server. Solutions include setting up another SQL Server with the desired Collation and transferring the Database using DTS or using BCP to export the data before rebuilding the Server with the new Collation.See SQL Server Suggestion - Change the collation

Using SQL Server 2000 and Above
Unlike SQL 7.0, 2000 does support different collations for each database on the one server. The ALTER DATABASE COLLATE command will only change the *DEFAULT* collation of the database, it will not change collation of existing objects (e.g. columns & tables). They will still be stored in the old collation order even if the default is changed. You'll need to
  • Individually alter existing columns to the desired collation (you can generate a script based on sysobjects if you want to follow this path) - but this is more complicated and not recommended. See Altering Collation for columns on all tables in a database OR
  • Recreate the tables with a script excluding the collation settings (as described below) and DTS the Data Into the new structure

Servers have a default Collation which is inherited by new Databases where a Collation is not specified.
Databases have a Collation. Either unspecified (which uses the Server default) or a specified Collation.
Columns have a Collation. Either unspecified (which uses the Database Collation) or a specified Collation.

Warning: these steps assume that the Database uses a single Collation for all objects specified at the Database level. If you require different Collations for individual columns then do not proceed.

Steps for SQL Server 2000
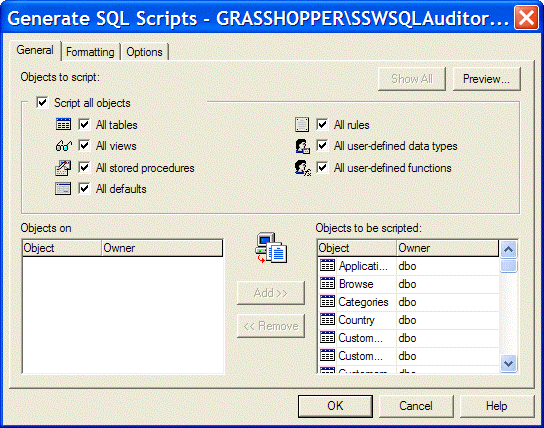
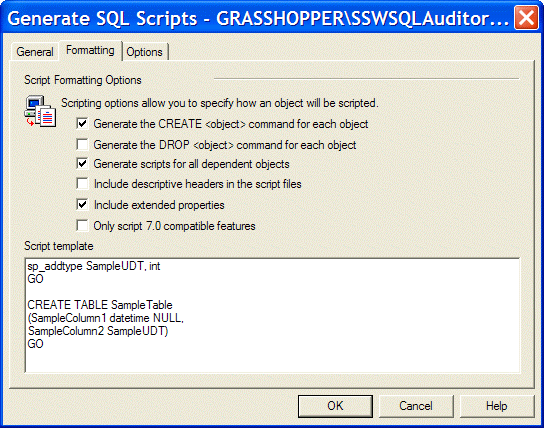
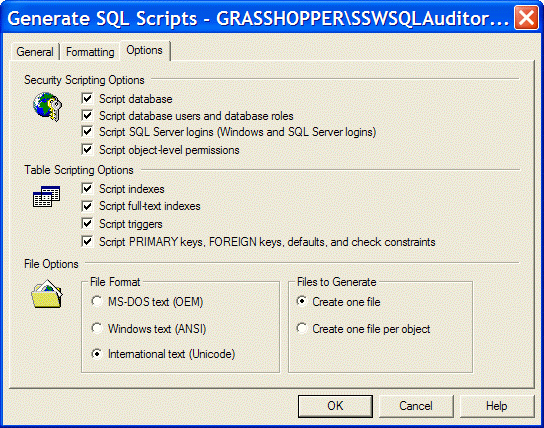
  1. In Enterprise Manager: Generate a SQL Script that will recreate the Database.
    Right-click on the Database > All Tasks > Generate SQL Script…
    Show All > Tick All Objects


  2. Save the script to disk for later use.
  3. In Enterprise manager, make sure that the database is not in use by checking  Management > Current Activity > Process Info. The Database should not be listed under the Database column.
  4. In Query Analyzer run the following script to get a list of the files that the database uses 

    USE MyDatabase
    GO
    SELECT name, filename
    FROM sysfiles
    GO
    USE master
     
  5. Copy the results into a text editor for later reference.
     
  6. In Query Analyzer run the following script to detach the database.

    sp_detach_db @dbname='MyDatabase'
      
  7. In Windows Explorer: Rename the files that were listed in step 2 to <filename>OLD. E.g.
    rename MyDatabase.mdf to MyDatabaseOLD.mdf
    Note: Data files are usually in C:\Program Files\Microsoft SQL Server\MSSQL\Data\
  8. In Query Analyzer: Reattach the database with the name MyDatabaseOLD

    EXEC sp_attach_db
        @dbname = N'MyDatabaseOLD',
    @filename1 = N'C:\Program Files\Microsoft SQL Server\MSSQL\Data\MyDatabaseOLD.mdf',
    @filename2 = N'c:\Program Files\Microsoft SQL Server\MSSQL\Data\MyDatabaseOLD_log.ldf'
     
  9. Right-click on Databases and choose Refresh to show the renamed database.
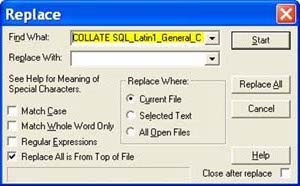
  10. In Query Analyzer: Open the saved SQL script and search the SQL Script for any COLLATE xxx statements and delete them.
    Eg. Find "COLLATE SQL_Latin1_General_CP1_CI_AS"
    and replace with nothing (empty string).
    This means that the database and columns will use the Collation specified as the server default collation.


  11. Optional: To use a particular Collation for the Database add a COLLATE statement to the CREATE Database statement and specify the desired Collation. If a collation is not specified the server default collation will be used. Removing all COLLATE statements means that the server default collation will be used.
  12. In Query Analyzer: Save and run the SQL Script to create a new Database with the desired collation.
  13. In Query Analyzer
    -- We are going to use DTS and DTS does not add data in the relationship order
    -- Therefore we need to turn off the relationship data check temporarily
    EXEC sp_msforeachtable 'ALTER TABLE ? NOCHECK CONSTRAINT ALL'
    -- and turn off all triggers temporarily
    EXEC sp_msforeachtable 'ALTER TABLE ? DISABLE TRIGGER ALL'

  14. In Enterprise Manager: Right-click on the Database with the incorrect Collation (the 'OLD' database) and choose All tasks > Export Data…  > Next
  15. Check the Source Database settings are correct (e.g. MyDatabaseOLDCollation) then press Next
  16. Select the new empty Database as the Destination. E.g. MyDatabase
  17. Select 'Copy Objects and Data between SQL Servers' > Next
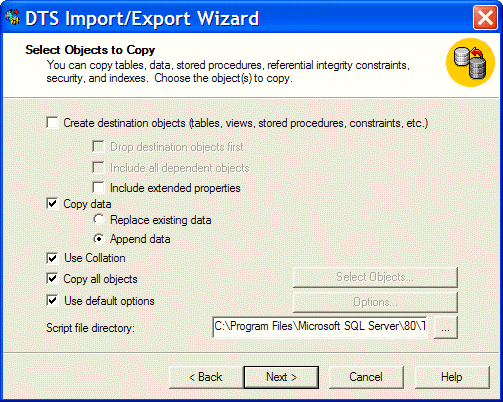
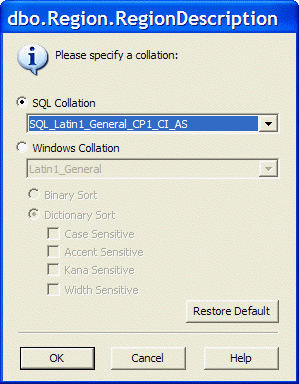
  18. (see image below)
    Note: Don’t miss the tick on 'Use Collation'
  19. Next > Next > Finish
  20. In Query Analyzer
    -- Finished with DTS
    -- Therefore turn on the relationship data check again
    EXEC sp_msforeachtable 'ALTER TABLE ? CHECK CONSTRAINT ALL'
    -- Therefore turn on the triggers again
    EXEC sp_msforeachtable 'ALTER TABLE ? ENABLE TRIGGER ALL'

    Which Collation to Use?

There is no 'recommended' Collation as different Collations will be used in different countries. As a guideline:

  • United States installations should use the SQL_Latin1_General_Cp1_CI_AS Collation
  • Non-United States installations in English speaking countries (eg. UK, Australia) should use the Latin1_General_CI_AS Collation.

Once a Collation has been decided on, it should be used for all servers in your organisation.

More Information

SQL Server Books Online
Topic: Data Conversion and Transformation Considerations
Section: Code Pages, Collation, and Non-Unicode Data Issues
Section: Copy SQL Server Objects Task

SQL Server Architecture - Changing Collations
http://msdn.microsoft.com/library/default.asp?url=/library/en-us/architec/8_ar_da_819v.asp

Keywords: Hot Tip - SQL Server 2000  Hot Tip - SQL Server 2005    

New Search SSW Custom Support

Posted by onewater
,

Dear Chicagoist,

I know I'd probably know the answer to this if I grew up in Illinois and had to sit through some local history course in grade school, but I can't help that I'm a transplant. My question is, what's up with the alternate names for the highways here? Who is Dan Ryan and Stevenson and those other guys? And why can't I ever remember which is which when I'm listening to the traffic reports?

Disoriented

2007_02_askhighways.gifGreetings, Disoriented!

Don't feel bad; we didn't grow up here either, and we've never thought to figure out who's who. After a while the monikers of the not-so-aptly-named expressways seem to become less actual names and more just nouns to describe where we're going to get stuck in traffic while deluding ourselves into thinking we can actually make it out of the city in less than an hour to start our vacation.

We think that Chicagoans like to refer to the names rather than the numbers as much as possible, especially during traffic reports, in order to completely confuse unwitting cross-country travelers as they squint at their maps (which of course don't define what the Dan Ryan is), wondering why exactly they thought going through Chicago was the best way to get to Aunt Gertrude's in Kansas.

Either way, the names have stuck, and we all use them once we've decoded them. But our commentary aside, you wrote because you want to know who these people are who warrant Abby Ryan talking about them at breakfast every day.

The Dan Ryan "runs from the Circle Interchange with I-290 near downtown Chicago, Illinois through the south side of the city. It is signposted as both Interstate 90 and Interstate 94 north of 66th Street and only Interstate 94 from 66th Street to 99th Street." It opened in 1962 and was named after Cook County Board President Dan Ryan Jr., who had died the previous year. During the initial construction of the highway, it was generally conceded that the location was chosen in order to "reinforce Chicago's racial boundaries ... [forming] a more effective barrier between the largely black South Side ghetto and the largely white working-class neighborhood of Bridgeport to the west."

The Stevenson, I-55, refers to former one-term Illinois governor (he was elected in 1948) Adlai E. Stevenson II. The highway opened in 1964, Stevenson died in 1965, and the highway was named after him right after that. Stevenson also ran for president against Dwight Eisenhower two times (and obviously lost), and, more successfully, was the U.S. Ambassador to the U.N. from 1961 until he died.

Speaking of Eisenhower, the Eisenhower Expressway, or I-290, was, of course, named after former president Dwight Eisenhower. As a result, we tend to shorten the name of the expressway to the Ike. You might also hear it called the Congress Expressway, after the street downtown that the highway turns into. The expressway first opened in 1955.

The Edens Expressway is I-94 running north from the city, and opened in 1951, making it the very first expressway in Chicago. We'll let you decide if that's a blessing or a curse. The road was named after William Edens, a Chicago banker who was in charge of the Illinois Highway Improvement Association, advocated paved roads, but apparently never actually drove a car.

In 1996, the Bishop Ford Freeway was named after Chicago religious activist and apostle of the National Church of God in Christ, Bishop Louis Henry Ford. The freeway itself is a portion of I-94 which "runs from Interstate 57 south to the intersection with Interstate 80, Interstate 294 (Tri-State Tollway) and Illinois Route 394."

We're only going to mention the Kennedy Expressway to tell you that it's I-90, and opened in 1960. We think you can figure out for yourself who it's named after. It used to be called (and again, you might still hear this from time to time) the Northwest Expressway, but was dedicated to JFK in 1963 following his assassination.

As for why you can't keep all of these names straight, we can only insist that with practice and hours spent dealing with construction delays, you too will soon know the difference between a Bishop Ford and a Stevenson. Trust us.

http://chicagoist.com/2007/02/20/ask_chicagoist_whats_with_the_highway_names.php

Posted by onewater
,

Recovery Console in Windows XP

Description of the Windows Recovery Console

This section describes the functionality and limitations of the Windows Recovery Console. The Windows Recovery Console is designed to help you recover when your Windows-based computer does not start properly or does not start at all.

When you use the Windows Recovery Console, you can obtain limited access to NTFS, FAT, and FAT32 volumes without starting the Windows graphical interface. In the Windows Recovery Console you can:

Use, copy, rename or replace operating system files and folders, Enable or disable services or devices from starting when you next start your computer, Repair the file system boot sector or the Master Boot Record (MBR), Create and format partitions on drives.

Note that only an administrator can obtain access to the Windows Recovery Console so that unauthorized users cannot use any NTFS volume.  More Information.

To install the Recovery Console as a Startup Option

With Windows running, insert the Setup CD into your CD-ROM drive. Start/Run/X:i386\winnt32.exe /cmdcons. Follow the instructions on the screen.

Notes:

To run the Recovery Console, restart your computer and select the Recovery Console option from the list of available operating systems.

You must be logged on as an administrator or a member of the Administrators group in order to complete this procedure. If your computer is connected to a network, network policy settings may also prevent you from completing this procedure.

To see the commands available on the Recovery Console, type help at the at the console prompt.

To start the computer and use the Recovery Console

From the Setup CD-ROM

Insert the Setup compact disc (CD) and restart the computer. If prompted, select any options required to boot from the CD.
When the text-based part of Setup begins, follow the prompts; choose the repair or recover option by pressing R. If you have a dual-boot or multiple-boot system, choose the installation that you need to access from the Recovery Console. When prompted, type the Administrator password. At the system prompt, type Recovery Console commands; type help for a list of commands, or help commandname for help on a specific command.

To exit the Recovery Console and restart the computer, type exit.

If you have already installed the Recovery Console

During Startup, select Recovery Console from the startup options menu. If you have a dual-boot or multiple-boot system, choose the installation that you need to access from the Recovery Console. When prompted, type the Administrator password. At the system prompt, type Recovery Console commands; type help for a list of commands, or help commandname for help on a specific command. To exit the Recovery Console and restart the computer, type exit.

Important Note:  Because the Recovery Console is quite powerful, it is recommended for use only by advanced users or administrators.

To Delete the Recovery Console

Open My Computer.
Double-click the hard drive on which you installed the Recovery Console.
On the Tools menu, click Folder Options.
Click the View tab.
Click Show hidden files and folders, clear the Hide protected operating system files check box, and then click OK.
At the root directory, delete the \Cmdcons folder.
At the root directory, delete the file Cmldr.
At the root directory, right-click the Boot.ini file and then click Properties.
Clear the Read-only check box, and then click OK.
Open Boot.ini in Notepad, and remove the entry for the Recovery Console. It will look similar to this:
C:\cmdcons\bootsect.dat="Microsoft Windows Recovery Console" /cmdcons

Save the file and close it.

Modifying the Boot.ini file incorrectly may prevent your computer from restarting. Be sure to delete only the entry for the Recovery Console.  Notes:

To open My Computer, double-click the My Computer icon on the desktop.
It is recommended that you change the attribute for the Boot.ini file back to read-only after you complete this procedure. You may also want to hide your system files again.
 

The commands available when using the Recovery Console are:

Attrib CD Chdir
Chkdsk Cls Copy
Del Delete Dir
Disable Diskpart Enable
Exit Expand Fixboot
Fixmbr Format Help
Listsvc Logon Map
MD Mkdir More
Rd Ren Rename
Rmdir Type Systemroot

Attrib: Changes the attributes of a file or directory.
Batch: Executes the commands specified in the text file.
ChDir (Cd): Displays the name of the current directory or changes the current directory.
Chkdsk: Checks a disk and displays a status report.
Cls: Clears the screen.
Copy: Copies a single file to another location.
Delete (Del): Deletes one or more files.
Dir: Displays a list of files and subdirectories in a directory.
Disable: Disables a system service or a device driver.
Diskpart: Manages partitions on your hard drives.
Enable: Starts or enables a system service or a device driver.
Exit: Exits the Recovery Console and restarts your computer.
Expand: Extracts a file from a compressed file.
Fixboot: Writes a new partition boot sector onto the system partition.
Fixmbr: Repairs the master boot record of the partition boot sector.
Format: Formats a disk.
Help: Displays a list of the commands you can use in the Recovery Console.
Listsvc: Lists the services and drivers available on the computer.
Logon: Logs on to a Windows 2000 installation.
Map: Displays the drive letter mappings.
Mkdir (Md): Creates a directory.
More: Displays a text file.
Rename (Ren): Renames a single file.
Rmdir (Rd): Deletes a directory.
Set: Displays and sets environment variables.
Systemroot: Sets the current directory to the systemroot directory of the system you are currently logged on to.
Type: Displays a text file.

This list can be obtained in the Console by typing "help" without the quotes.

A Discussion About the Bootcfg Command and Its Uses

The bootcfg command is a Microsoft Windows XP Recovery Console command that manipulates the Boot.ini file. This command has a function that can scan your hard disks for Microsoft Windows NT, Microsoft Windows 2000, and Windows XP installations, and then add them to an existing Boot.ini file or rebuild a new Boot.ini file, if one does not exist. The bootcfg command enables additional Boot.ini file parameters to be added to existing or new entries.

To use the bootcfg command, start the Recovery Console with the Windows XP CD-ROM, and then click Recovery Console. Or, install the Recovery Console locally, and then select the command from the Boot menu. More Information.

How to Boot Windows Preinstall Environment from a Hard Disk

This section describes how to configure the Windows Preinstall Environment (WinPE) to boot from a hard disk.

NOTE: More than likely the supported methods to boot WinPE (by means of a CD-ROM or from a Remote Installation Services (RIS) server) are the most commonly used methods. The method that is described in this article is provided for
informational purposes.  More Information.

Access Floppy Drive from Recovery Console

To enable write access to floppies from within the R.C., click Start, Programs, Administrative Tools, Local Security Policy. Under Local Policy, Security Options, double-click "Recovery Console: Allow floppy copy and access to all drives and all folders." Select Enabled, then click OK.

Note: The following steps may also be necessary:

"After you enable the security policy, it must be applied (possibly across the domain) before becoming the effective policy on the local computer. This is necessary before the set command is truly enabled and available for use during a Recovery Console session. You can run the following command to force a refresh of the local computer's policy after performing the policy change listed above:  secedit /refreshpolicy machine_policy

After the local policy is refreshed and the enabled Recovery Console security policy is in effect, you should be able to start Recovery Console and use the set command to enable any of the four environment options."

In the Recovery Console, you must then type: set AllowRemovableMedia = TRUE

Accessing Other Folders in Recovery Console

This security policy will also access to files and folders other than the defaults (normally access is restricted to \winnt and \cmdcons).  To enable access to other folders, simply boot to the Recovery Console command prompt and  type: set AllowAllPaths = true

You will then be able to access other files and folders on your computer.  Please keep in mind that this is a potential security problem, and that you should be careful to restrict physical access to computers that are configured in this way.

XP Support- 01/01/2005 12:42 AM - Home Page WinXP
© Copyright Kelly Theriot MS-MVP(DTS) 2005. All rights reserved.
Posted by onewater
,